Welcome to this web log

This blog site is still being populated at the time being. And I do still fill out many of the template areas. Rome was not built in one day :-)

Nisl At Est?

Sea summo mazim ex, ea errem eleifend definitionem vim. Ut nec hinc dolor possim mei ludus efficiendi ei sea summo mazim ex.

In Felis Ut

Phasellus facilisis, nunc in lacinia auctor, eros lacus aliquet velit, quis lobortis risus nunc nec nisi maecans et turpis vitae velit.volutpat porttitor a sit amet est. In eu rutrum ante. Nullam id lorem fermentum, accumsan enim non auctor neque.

Risus Vitae

Phasellus facilisis, nunc in lacinia auctor, eros lacus aliquet velit, quis lobortis risus nunc nec nisi maecans et turpis vitae velit.volutpat porttitor a sit amet est. In eu rutrum ante. Nullam id lorem fermentum, accumsan enim non auctor neque.

Quis hendrerit purus

Phasellus facilisis, nunc in lacinia auctor, eros lacus aliquet velit, quis lobortis risus nunc nec nisi maecans et turpis vitae velit.volutpat porttitor a sit amet est. In eu rutrum ante. Nullam id lorem fermentum, accumsan enim non auctor neque.

Eros Lacinia

Sea summo mazim ex, ea errem eleifend definitionem vim. Ut nec hinc dolor possim mei ludus efficiendi ei sea summo mazim ex.

Lorem ipsum dolor

Sea summo mazim ex, ea errem eleifend definitionem vim. Ut nec hinc dolor possim mei ludus efficiendi ei sea summo mazim ex.

img

Sed ut Perspiciatis Unde Omnis Iste Sed ut perspiciatis unde omnis iste natu error sit voluptatem accu tium neque fermentum veposu miten a tempor nise. Duis autem vel eum iriure dolor in hendrerit in vulputate velit consequat reprehender in voluptate velit esse cillum duis dolor fugiat nulla pariatur.

Ipsum dolor - Ligula Eget

KOCH Engineering

Here a list of the latest projects

Get Raspberry to reboot every night

The Raspberry can dependent of the usage and the programs that runs “eat up” it’s memory sooner or later. This can cause all kind erratic behaviors. To be sure to have a clean and “fresh” rebooted version every day you can add an automatic job to reboot it. This is easily done using a cronjob.

To change setup use an editor and edit the file:

Cronjob

A Cron (comes from Greek Chronos) is used to schedule various commands at a specific time. Scheduled tasks or commands is called “Cron Jobs”. These can be used for running automated backups, monitoring disk space, deleting files periodically etc.

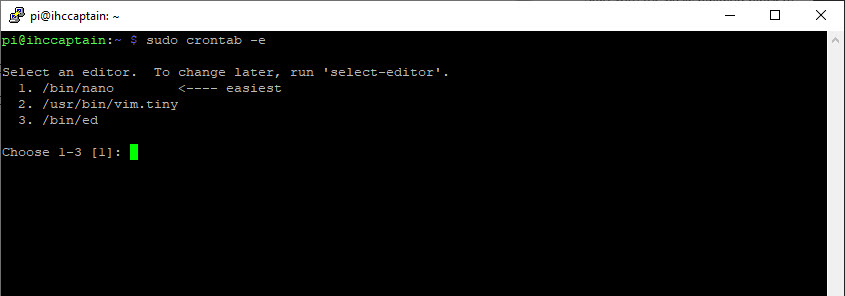
To do this log into your Raspberry Pi using SSH. Putty is a perfect tool for this

sudo crontab -e

If this is your first time setting up cronjobs you will be asked to select an editor

2022-06-18_17-34-58 Get Raspberry to reboot every night

I selected the first one by typing “1” to select the nano editor

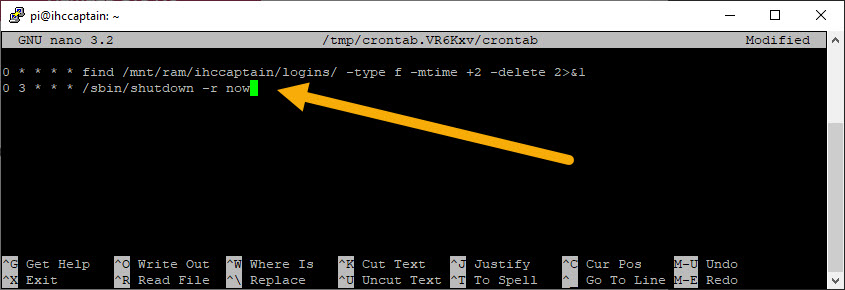
I want my raspberry pi to boot every night at 3am. (03:00).

Add the following command to the end of the file

0 3 * * * /sbin/shutdown -r now

This will shutdown and reboot the raspberry pi scheduled every night at 3 o’clock

2022-06-18_17-39-16 Get Raspberry to reboot every night

Now press Ctrl-O to write the changes to the file and exit by pressing Ctrl-X

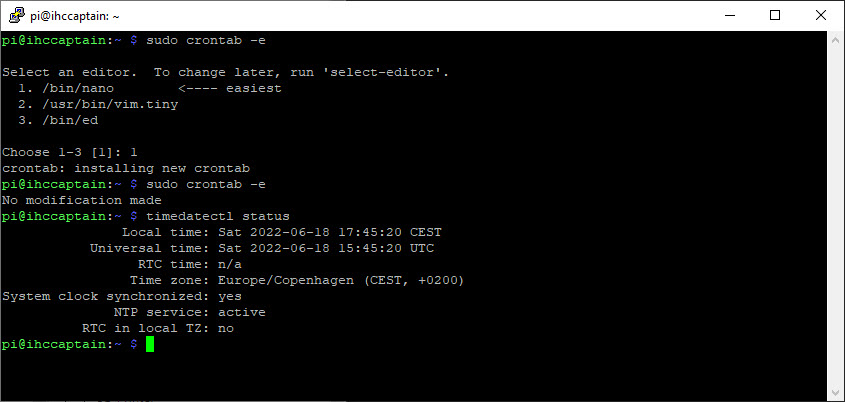
Check that the Raspberry Pi knows the time of day

To make sure your Raspberry Pi knows the time of day and therefore does the cronjobs on the correct time of the day, you can ask it about the time by typing this command:

timedatectl status

In this example you can see the time and also make sure that it updates it clock automatically as it’s using a NTP Service The NTP service is active and the time I got from this command is the correct time in my day zone.

3D-Printer Enclosure Fan Control

The Tukkari TLX Enclosure

I have bought the Tukkari TLX version of 3D/printer cabinet for Prusa i3 MK3+. This nice enclosure comes as a kit and it comes with a active carbon- and HEPA filter in the kit to reduce nanoparticles and fumes that can come from the 3D printing process.

To get the sometimes toxic particles out of my room someting needs to be done.

Take a look at Tukkari’s page for the different products that the manufacture and sells>

https://www.tukkari.com/p/tlx-white-prusa-i3-mk2-mk3-enclosure#

Tukkari TLX Enclosure for Prusa i3 MK2/MK3 (White color)

TLX-White-Prusa-i3-MK2-MK3-Enclosure 3D-Printer Enclosure Fan Control
Tukkari Printer Enclosure

A 120 mm. fan can be mounted either inside or on the back of your enclosure. As I plan to let the air out of the enclosure and guide it out of my room I install the fan on the back of the enclosure as shown here. The bolts are already included in the kit when buying the enclosure from Tukkari

Installing a fan to the enclosure (optional)

The enclosure comes with a filter that you can be mounted either on the inside or at the outside of the enclosure. As I want to mount a fan on the outside I mounted the filter on the inside.

The fan is an optional thing and are not included with the enclosure kit from Tukkari.

I ordered a 120 mm. noctura low noise 5V version to be able to power it from the Raspberry Pi I use as printer server.

In my case I ordered the Ultra Low Noise NF-F12 5V fan (5V USB cable included).

This noctua fan comes with different cable parts. When adding the USB Type-A to the end the cable length is long enough to be router from the back of the enclosure and into the left (seen from the front of the enclosure) cable entry and the to be mounted into one of the USB connectors on the raspberry Pi that I have added to the printer aluminum profile with a 3D printed box

Noctua-NF-F12-5V-1024x832 3D-Printer Enclosure Fan Control
noctura_5v_cable 3D-Printer Enclosure Fan Control

Note! The image is for the PWM version. In the 5V version the cable part (USB-A) is included

Link to the fan at noctua’s webpage:

https://noctua.at/en/products/fan/nf-f12-5v

Setting up Octoprint to to start and stop the enclosure fan

To be able to control the Fan in the enclosure several things needs to be done

Adding system menu’s to control the USB power on the Raspberry PI

Shell scripts to control power to USB connector on Raspberry Pi

I created two different shell scripts. One to turn on USB power and one to turn off the USB power. In my case I use the Raspberry Pi 3B+. The version has 4 USB-A ports. Unfortunately these are all controlled simultaneously. If you turn off one the three others also will be powered off. In my case I have a Webcam, the fan and a LaMetric display connected to my Raspberry Pi. That is not a problem that they are all turned off when I want to turn of the power for the fan for the enclosure. On the Raspberry Pi 4 you can turn the two blocks of 2 USB connectors on and off independently

To be able to turn of the power for the USB connectors from the command line you first need to install the uhubctl USB Power Contrll package. This can be installed like here:

git clone https://github.com/mvp/uhubctl
cd uhubctl
make

This should generate uhubctl binary. You can install it in your system as /usr/sbin/uhubctl using:

sudo make install

Then you can call this library

2022-06-15_16-56-44 3D-Printer Enclosure Fan Control
usb_on.sh contains:
sudo /home/pi/uhubctl/uhubctl -l 1-1 -p 2 -a on

usb_off.sh contains:

sudo /home/pi/uhubctl/uhubctl -l 1-1 -p 2 -a off

To be able to call these two scripts from the Octoprint UI I will add two commands to the System menu on the printer interface. This can be done by changing the config.yaml file which can be found in the

/home/pi/.octoprint folder

Edit the config.yaml file and add the following code (place it in just before the temperature: part of the file.

system:
  actions:
  - action: Uoff
    command: /usr/local/bin/scripts/usb_off.sh
    name: Turn USB Power Off
  - action: Uon
    command: /usr/local/bin/scripts/usb_on.sh
    name: Turn USB Power On

After this and restarting the Octoprint you can then find two new commands in the Octoprint userinterface

2022-06-15_00-29-03-1024x658 3D-Printer Enclosure Fan Control

User rights to run the shell command from Octoprint

Some more thing needs to be done before being able to control the USB power from Octoprint. You need to change the user rights for this.

Go to a shell and do the two following chmod commands

2022-06-16_00-35-53 3D-Printer Enclosure Fan Control
chmod a+x /usr/local/bin/scripts/usb_off.sh

and

chmod a+x /usr/local/bin/scipts/usb_on.sh

This will add permission for all users to execute the two .sh files

chmod: change mode (permissions) of a file.
a+x: for all (a) users, add (+) the execute (x) permission

Now trying this out from the system menu results in the following where we get "Success" response from the system:
2022-06-17_23-02-00-1024x694 3D-Printer Enclosure Fan Control

Make the fan turn on and off automatically when printing

To be able to turn on the printer when starting to 3D print it can be nice if this can be done using G-CODE commands that is commonly being used in computer-aided manufacturing to control automated machine tools like 3D-printer and CNC milling machines.

When in my case the PrusaSlicer tool slices a STL file into a machine script file, it could be nice also to be able to turn the enclosure fan on before starting to print. And to turn it off again after the print has been finalized.

2022-06-16_23-24-42-1-973x1024 3D-Printer Enclosure Fan Control

Lets define two G-Code commands. In my case have made GCODE10 which call the usb_on script and a GCODE11 which calls the usb_off script. Look below to see the two definitions

2022-06-16_23-32-53-1-898x1024 3D-Printer Enclosure Fan Control

Now we have these we need to be able to inject those GCODE commands during a print of a part. The most of the GCODE comes from the PrusaSlicer output file.

In the menu Printer | GCODE Scripts you are able to add more commands that call be call before, after a job completes and after a job is cancelled and after a job is paused.

In this case we will add the two newly defined GCODE commands in the start and after job completes section of this setup page. Look here where marked with arrows.

2022-06-16_23-36-32-905x1024 3D-Printer Enclosure Fan Control

Now the enclosure fan turns on when the print job starts. And after the print completes it automatically turns off the enclosure fan turns off.

That’s it!

winking-face_1f609 3D-Printer Enclosure Fan Control
Mission Complete!!